Wednesday, February 13, 2019

The Plan

Things have been a bit busier than usual over here the last week or two. I interviewed, started paperwork, and started training for a new job working with kids. So I've been running back and forth trying to get fingerprints and doctor signatures and all kinds of stuff for that. Also, we just got our puppy spayed. So I had to go drop her off one day and pick her up the next and we've been keeping a watchful eye on her to make sure she doesn't hurt herself. And then my mother-in-law came into town for the weekend so I was busy cleaning and doing everything to get ready for that. Last week was crazy. This week I officially started clocking hours at the new job, but today is my first long day.

I've spent the last 8 years working at home on a computer. This new job will have me up on my feet. I also won't be able to just sit and snack during the day. It is going to be kind of a big adjustment for me. I've had problems with my back for the last two years and I'm going to have to find a good chiropractor sooner rather than later. I've been seeing one, but I think I'm ready to try a new technique and just see if it helps. I'm excited about this change though, because it means I won't be sitting all day. I will be up and either playing with, taking care of, or guiding the kids; or I will be cleaning up after them. I'm excited to see if this helps my metabolism a bit. I haven't gotten a good reading yet, but so far I've already seen the numbers on the scale go down. I will see what happens when I weigh in on Friday. 

So my plan for this journey is to use this new job to my advantage. I am not going to pack junk food to snack on, I don't have the time to run to the store just because of a craving or whatever. So now I just need to get organized. I want to come up with a better meal plan that I can actually stick to. I have a crock pot and an InstantPot, so there's no reason I can't use those to make some healthy meals even if I'm short on time. I need to get more organized with breakfast. Typically, breakfast is a mess because I have so much to do in the morning to get the kids ready and get ready for job #1 and mostly I end up just eating coffee and toast, which isn't terribly nutritious, lol. And then I get hungry again and end up snacking. 

Another hard part of this routine is that I am going to have to struggle to fit in a workout. I still have job #1 in the morning and job #2 in the afternoon. And then kids' bedtime comes and by the end of that I am ready for bed too, lol. But I want to focus on the food for now and get some good momentum. The better I do with that, the more energy I will have and hopefully I will be able to start fitting in a workout then too. 

It's tough sometimes because I want to be able to jump in with food and exercise and everything all at once. But I need to be careful with my back, I don't want to burn out too quickly, and mostly I'm afraid if I try too much I will get stressed and stress eat, which is the exact opposite of what I'm trying to accomplish. But the first time I lost weight, I was able to spend 6 months just focusing on my diet and I lost 50 pounds... without working out at all. So that gives me hope that I can do it again. I'm not in a race, I'm on a long journey, one that I hope to be able to enjoy, and I've got to do the best I can do with what I've got to work with. One day at a time, one step at a time. I know I can do this!

Friday, February 1, 2019

Well... That didn't go as planned!

So last I checked in, it was Sept 2015. I shared that I'd just had a baby boy and was hoping to get back on track with my weight loss and would writing another post again soon. Yeah, that didn't happen. And now it's January of 2019, so about three and a half years later and a bit has changed. I managed to lose almost all of my baby weight ... and then got pregnant again. We welcomed our daughter in April of 2017. I gained all of the weight back... and then some. After I delivered her, I lost a good chunk, but I'm still about 100 pounds over where I want to maintain. I'm pretty close to where I started out when I first started this whole journey in 2008. 


Things have settled with the kids. Our son, Wyatt, is now three and a half and (mostly) potty trained. Our daughter, Penny, will be 2 in a few months and is learning about 20 new words every day and never stops talking, lol. It's been more of a struggle to transition from one kid to two kids than it was for me to go from no kids to one kid. Self-care has not been a main priority, but I'm ready for that to change. I am still dealing with some back pain from my second pregnancy. I've seen a chiropractor for about two years, but haven't made a whole lot of progress. I'm hoping if I can drop some weight and get back into working out, it will help strengthen my body and get my back in place too. 

My plan is to try to do what I did the first time. I'm going to start with counting calories and maybe even do Weight Watchers again. I also have a Beachbody On Demand account, so I have access to all of my favorite workouts and will be able to pick and choose depending on what will work best for my back. 

This time around will be more of a challenge because I now have to cook and plan for not only myself, but my husband and two little (semi-picky) eaters. They eat a decent variety, but when I lost the weight the first time, I stuck to a very simple rotation of foods and kept any tempting food out of the house. I still try to keep the tempting food out of the house, but it's hard when your kid comes up to you and says, "We should make cupcakes today!!!" I almost always have the ingredients needed for homemade sweets, lol. And my family is not as ok as I am to eat the same few meals over and over without getting tired of them. When I first start out, "less is more", so I find a few meals that work for me and stick to that. As I do better, I branch out. But it's harder when you're cooking for others. So that will be a new challenge for me. Also, as many moms will tell you, kids wear you out. A lot. So I don't have as much enthusiasm or time for standing in a kitchen for an hour making a delicious home-cooked meal  like I used to. I prefer something I can get out in fifteen minutes. The natives get a bit restless if I take too long, lol. And nowadays, cleaning is an all-day job. Over and over. Because 1 and 3 year olds make messes. It's basically their main job, lol. So the longer I cook, the bigger the mess they make. And after a day of working and playing and cleaning, I don't always feel up to making a big dinner.

So I've got a few more challenges, but I also have some things working in my favor. I have the kids now, which means that I am up and active more often. I can play with them and when it's nice out, we like to go to the park or go for walks or bike rides. I also have to be a better example for them. They learn from me and what they see me do. I want to give them a healthy lifestyle now so they can continue it when they get older. So that means I need to get my butt in gear. Our family is complete with the four of us. I won't be getting pregnant again. I am still nursing, but just once a day and that will probably be done soon too. I feel like I'm getting my body back. If I can get my back fixed, I should be good to go. 

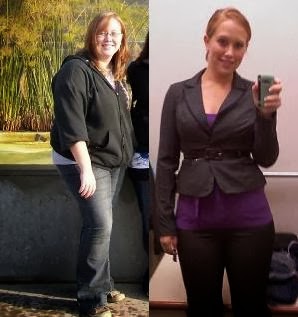
I think 2019 is going to be my year to get back to feeling like "me"! I took a picture back in 2009 when I had lost all of the weight the first time. I want to try to recreate this photo in November as a 10-year comparison. So ... wish me luck! 

Oh, I forgot to mention. We also added a fur baby this year. Her name is Lucy, Lu for short, and she's about 7 months old. We don't know much about her background, but she is a bit nervous around the kids. When we first got her, right after Christmas, she was constantly between our feet, trying to hide under us. We've had her for a month now and she still gets a little nervous around the kids, but she also plays with them now. She's eating and drinking normally, she loves to play outside. She is the sweetest girl and she loves her squeaky toys. She's a bit of a bed-hog, but she also keeps my feet warm, so I'm ok with it. We are happy to have her be part of our family! 


Tuesday, September 1, 2015

A Year and a Half Later ....

It's been about a year and a half since my last post. The gap started because I had gotten off track and then started gaining weight and was just embarrassed about it and wasn't gaining any traction with my attempts to get back on track. 

And then I started a side project. A big side project. One that took all of my focus. It required a ton of reading, research, and preparing. It was physically and emotionally challenging and also incredibly rewarding. This project is something that I will be working on for the rest of my life. And his name is Wyatt.  


My husband and I had a baby!! We decided to try to grow our family last summer. We found out that we were pregnant in October and it's been one heck of a ride ever since. As women often do with pregnancy, I have gained some weight. About twice what I was supposed to gain, actually. So that's why I'm back here. I want to get back into writing about my journey. I want to post healthy recipes and talk about my workouts. I want to get motivated again to lose this baby weight! I don't know how often I'll be able to post and I don't have any specific plans for what I will post, but I want to start again and get back to being healthy for my baby boy. I'm 8 weeks postpartum now so I would like to get back into exercising, slowly, and make time to start cooking healthy.

So this is my introduction, to my baby and to the next twist in this journey. I hope to be back with another post soon! : )

Wednesday, March 26, 2014

I Cut My Hair!

I do this thing every few months where I get bored with my hair and I want a change. However, the problem is that I also do this thing where I grow my hair out really long, I cut it all off, I donate that hair, and then I start growing it all out again. So I can't keep cutting it otherwise I don't get to donate it. I also do not color or perm my hair in any way. It's just expensive and not really my thing. I actually love my hair color and have had some super horrible experiences with perms. Insert awkward poodle picture here:

That's me on the left. My cousin is the Curly Sue on the right. My hair was still wet in this picture. It got fuzzy and not so very pretty!

Anyway, back to my point. So I had a dilemma. I wanted a change, but I can't color or perm my hair and I can't cut it. Or at least not all of it. But, I could cut bangs!

And this is literally me, ME, cutting my hair. I have no experience with cutting hair, no training, just a set of itty, bitty scissors since our big ones went MIA, a YouTube tutorial video, and a bit more confidence than I should have maybe, lol. Again, I don't like to spend money on myself so I usually trim my own hair with the pony tail on top of your head technique and save the professional cuts for when I chop it all off and have little room for error.


Once I decided that I wanted to give myself bangs, I searched a couple of videos on YouTube and ended up with this one by Sam Villa  mostly because it was pretty simple and seemed pretty fool proof.

So I went for it! I sectioned off the hair I wanted to cut and did his twist technique and took a breath and started cutting. I started out cutting it longer than I wanted, just to make sure I wouldn't take off too much. So I ended up cutting it about three times before I got it to the length that I liked. And I was impressed. It had a slight fringe to it, looked pretty even, and definitely transformed my look completely. I liked it.


What I did wrong though was take too much from the sides. So, if I do my hair correctly, I get a pretty cute look, but if I don't, I look like I have a slight mullet, lol. I also discovered that the hair style with my hair down kind of makes my face look chubbier, which is no bueno.

I've kind of gotten into the habit now of just sweeping the bangs to one side to create a fun side-bang look rather than the thick bangs in front. But I still have both options. I think side bangs look better with hair down and full bangs look better with my hair in a bun. So all in all, I like it because I have more variety than I did before. And more character. And I do wear my hair up pretty often, so it's nice to have more than just slicked back "bangs" all the time. I had fun with the experience and I have a feeling it won't be my last experiment in cutting my own hair, lol.

Tuesday, March 25, 2014

Paleo Brownies!

One of the biggest challenges with trying to keep our diet paleo has been desserts. I just don't think it's possible to go without desserts now and then. And it's not just me; Hubby has a sweet tooth too!

I've tried some cookie recipes and some pudding recipes. Spoiler alert: avocado pudding is no bueno. At least the kind I tried. I'd skip that one if you haven't tried it yet. Some of the cookie recipes aren't bad, but I kind of feel like a cookie isn't a cookie unless it has chocolate chips. And I haven't picked up any paleo chocolate chips yet, so they've been lacking something up til now.

I happened to come across this recipe for brownies, one of my favorite desserts, on Taylor Made It Paleo. I was skeptical at first, but I did my quick scan of the ingredients and they all seemed reasonable (we're ok with some honey).  

20140120 072726 Sunbutter Swirl Chunky Chocolate Brownies

I did need to pick up a few of the ingredients, and in the process I ended up swapping out the sunflower seed butter for regular peanut butter (much cheaper). I whipped everything together pretty quickly; it's a pretty easy recipe to follow and didn't take a ton of time either. The hardest part was waiting for them to cool before I could try them! ; )

I was immediately impressed. First bite! It was delicious! Hubby was impressed too. I've since made them for my parents and they both liked them. Again, my dad was not completely blown away by them like we were, but you can't win them all!

So this has become a recipe that I keep and make now and then when we've got a sweet tooth. I bet you could even freeze some and pull them out later for a quick treat. I can imagine it now, warmed up in the microwave with some ice cream on top, like she suggests. Mmm... I'm thinking I need to go whip up another batch right now!

I hope you enjoy them as much as we did!

Ingredients:

  • ½ cup coconut flour
  • ½ cup cocoa powder
  • 1 tbsp coconut crystals
  • ½ tsp baking soda
  • 1/8 tsp sea salt
  • 5 eggs
  • ¾ cup honey
  • 3 1/2 tbsp grass-fed butter, softened
  • 2 tbsp full fat, canned coconut milk
  • 1/4 cup Enjoy Life chocolate chips (or dark chocolate chips)
  • ½ cup pecans, roughly chopped
  • ¼ cup sunflower seed butter (or other nut/seed butter)

Directions:

  1. Preheat oven to 350 and line a 9×9 baking dish with parchment paper.
  2. In a medium sized bowl, combine coconut flour, cocoa powder, coconut crystals, baking soda, and salt.
  3. In a large bowl, whisk together eggs, honey, butter, and coconut milk.
  4. Slowly add dry ingredients to wet and mix until well combined.
  5. Stir in pecans and chocolate chips.
  6. Pour batter evenly into baking dish.
  7. Pour sunflower seed butter over top and “swirl” evenly into batter.
  8. Bake for 25 minutes, or until a toothpick comes out clean in the center.
  9. When finished, remove from oven and allow to cool for 5 minutes before serving.

Thursday, March 20, 2014

Apple Bumpkin Breakfast Recipe

I've been on the lookout for different breakfast recipes. It really helps Hubby if I have some kind of a casserole that he can just grab and heat up. And it helps me because then I don't have to get up earlier to whip something up, lol. 

I have kind of stuck to two main casseroles and I'll share the first one with you here. It's more of a sweet casserole that I happened to find on The Foodie & The Family website.  Maybe while browsing around on Pinterest? I can't remember exactly. But anyway, this one caught my eye because of the name. It's called Apple Bumpkin Breakfast Bake and the main ingredients are apples, eggs, and pumpkin. Not really the first thing you think of in terms of good combinations, right? But it is so good. So good!


I've kind of gotten into the habit of not putting the almonds on it anymore, just because they can be kind of expensive and we are on a budget. I also have never made it with the coconut for that same reason and also because it's not really a favorite ingredient of mine. But I will tell you that even without those two ingredients it is such a delicious dish! I've been tempted to add in some kind of meat, kinda like the apple flavored sausages I am curious how it would taste to mix the apple and pumpkin with some kind of meat. But that will be an experiment for another day. So far it hasn't been necessary. Hubby says it is not quite as filling as some of the other casseroles I've made, but again, he doesn't really agree that something is a meal unless it contains some kind of meat, and eggs don't count for him apparently, lol.


So here you go, the recipe from The Food & The Family: Apple Bumpkin Breakfast Bake!!


Ingredients:


  • 3 tart apples, peeled, cored, and chopped into 1/2″ chunks
  • 2-3 very ripe bananas, mashed
  • 12 large eggs
  • 14 ounce can pumpkin puree
  • 14 ounce can full fat coconut milk
  • 1/4 cup maple syrup (optional)
  • 2 teaspoons vanilla
  • 1 teaspoon ground cinnamon
  • 1/4 teaspoon nutmeg
  • 1/4 teaspoon salt
  • 1/4 cup sliced almonds (optional)
  • 1/4 cup ribbon coconut (again, I didn't use this)

 Instructions:

  1. Preheat oven to 425°F. Grease a 9×13″ baking pan well with coconut oil. Toss chopped apples into the pan, spreading evenly over the bottom.
  2. In a large bowl, mash bananas. Whisk in eggs, pumpkin puree, coconut milk, maple syrup (if using), vanilla, cinnamon, nutmeg, and salt. Combine well. Pour over apples in pan.
  3. Sprinkle the top of the mixture with sliced almonds and ribbon coconut (optional)
  4. Bake, uncovered, for 45 minutes; until set. Cut into 12 pieces and serve hot or refrigerate to serve cold.

Tuesday, March 4, 2014

Treadmill Desk

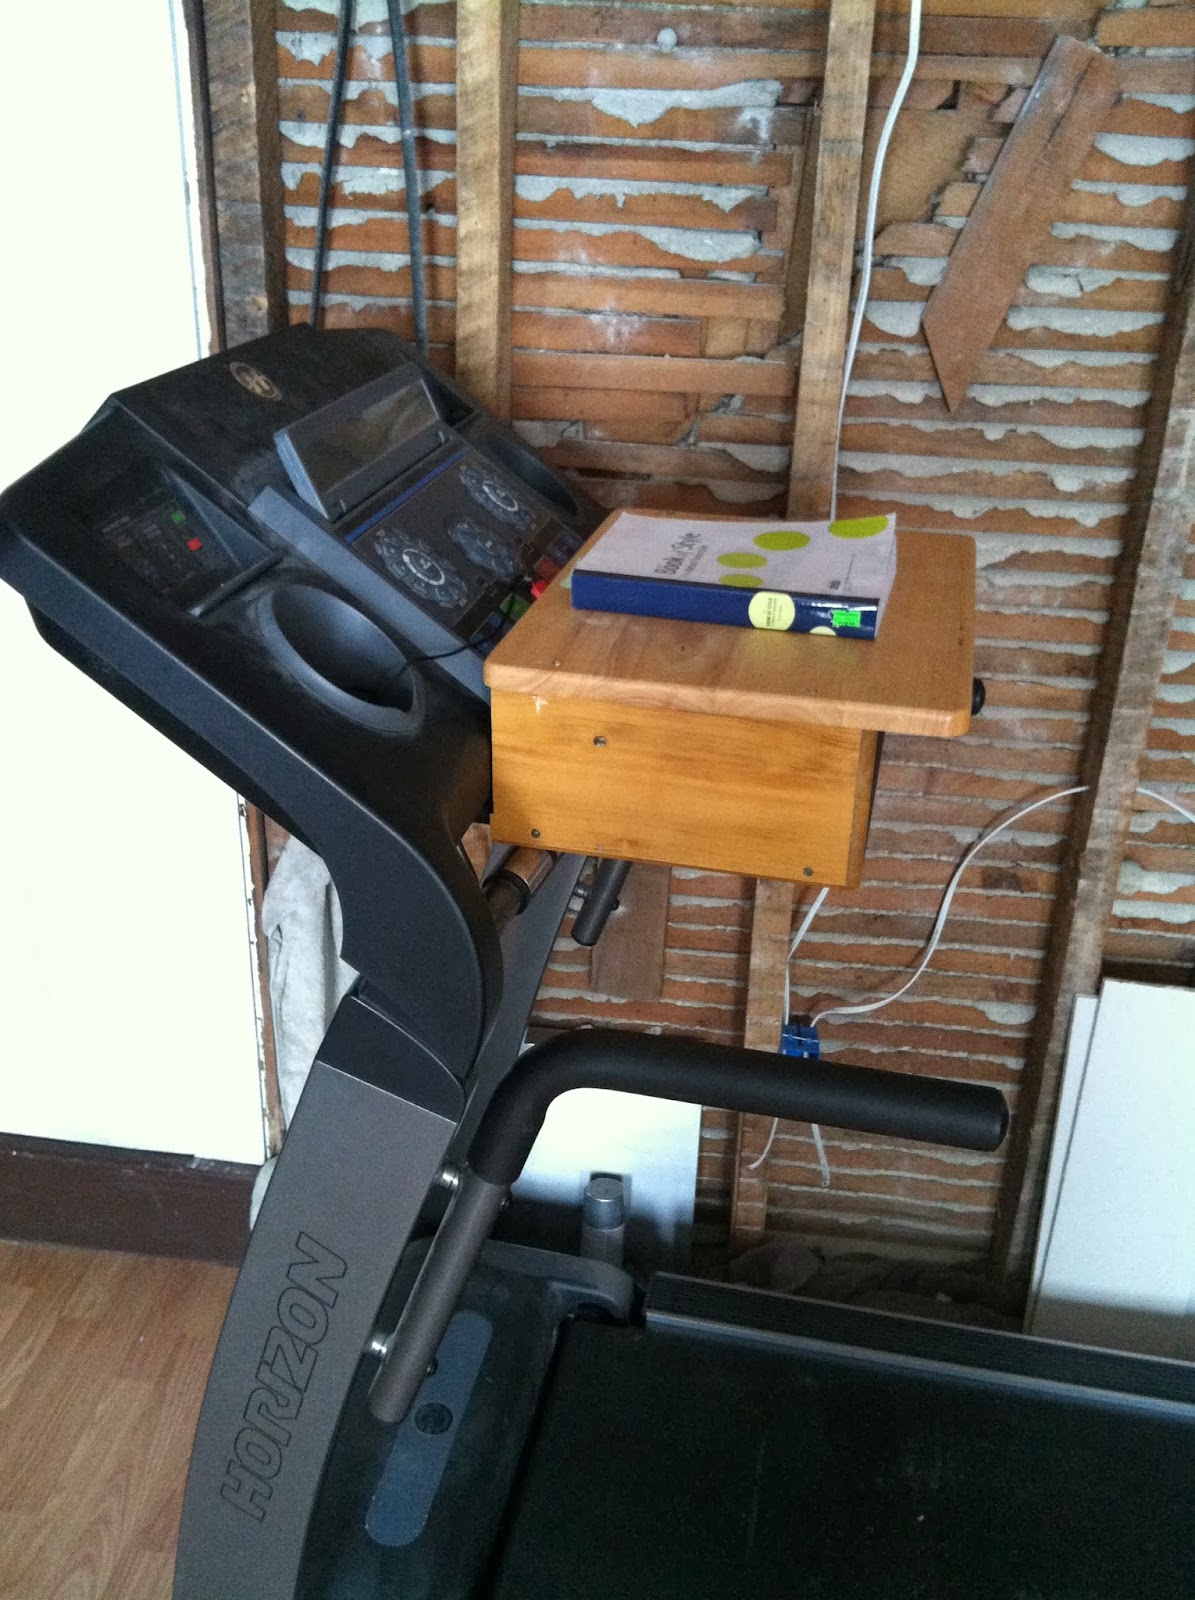
I posted on my Facebook page a while back that I got bored one day and decided to get a little handy. I actually used a saw for the first time, by myself, with no one else home. That may not have been the best idea I've ever had, but there was no tears or blood, so we're good. 

I was walking on the treadmill and I had happened to grab the top of an old desk that Hubby had taken off. He used the base of the desk for a radio table. So all that was left was a large flat piece. Well, I wanted to read while I was walking, so I wedged the black table top in between the grab bar of my treadmill and the large part where all of the buttons are. I'm getting real technical here, I know! 

It worked because I was pushing down on the free end, which wedged the other end in even more and it barely moved. Well, then I got to thinking... a dangerous pastime, right? (I've been watching too much Disney!)
Credit


I looked around the main room, while I was walking, and saw some old scraps of boards and realized that we have one of those folding TV trays that I could butcher, since we never used it. So I took an old shelf that we got with the house, the top of a folding TV tray, and the top of an old, wheeled computer desk and created ... a treadmill desk!!


I should have taken pictures of the process, but I wasn't all that confident that I could pull it off, to be honest. So I just dove in, hoped I didn't bleed to death, and hoped I didn't ruin anything before Hubby got home! 

I took the shelf and basically cut it in half, to create the sides of the treadmill desk. It was too low to just use the black table top, which you can't see in this picture, so I wanted to build it up a bit. I then just basically screwed the two pieces of the self on both sides of the TV tray and then attached the computer desk top to the bottom.


The black computer desk top is on the very bottom and still wedges in between my grab bar and the panel of buttons, so it stays there just fine, but I wanted to make it a little more sturdy, and support the end that actually holds the computer, especially since I'd probably lean on it a bit.

This part isn't so handy, it's more like I just stuck a long board on top of the handle bars and then wedged a couple of 2x4s in there so the bottom had something to rest on. I don't know if you can follow that, but that's as well as I can describe it. Anyway, here's my treadmill desk!
 

Sorry about the cruddy iPhone pics. I had Hubby take a couple of pictures for me to document it. You can also see that our main/family room is still a big hot mess. No walls and new electric hanging everywhere. I'll post an update about that tomorrow!

The good thing about my treadmill desk/treadmill is that it currently sits right next to an outlet that is in a light switch, so I can plug in my computer and my phone and all kinds of stuff while I work. I can walk, walk briskly, or just stand while I work. It's pretty great. I'm hoping to make a better version of the treadmill desk eventually, but I'm pretty proud of myself considering I had never used the saw before, I put it together after about ten minutes of planning it out in my head, and I did it out of all scrap pieces we had lying around the house. Woo! : )

Hope you enjoyed my tale of the treadmill desk construction. I'll try to do a better job with pictures and details next time I do something like this. Hope you all have a wonderful week! See you again soon!

Monday, March 3, 2014

What's Goin' On In the Family Room?

 Let's see... I really don't remember what all I've shared so far and what I have yet to show, so I'll just start from the beginning and do a total recap of our family room.

This used to be called our dining room, but we decided to switch it around a little bit. So this is now our family room. It's bigger and in the middle of everything and we won't be using the dining room nearly as much as the family room, so it just makes more sense. We are half thinking about leaving the dining table in the family room and making the room that would have been a dining room into an exercise room... but we'll see how that develops.

So this is how our room started out when we first bought the house. We had a drop ceiling. There were plaster walls covered with a paneling. Not just any paneling, but the darkest kind of paneling possible, which really made the room feel small and even with the curtains open, it never got all that light in there. 


And here's a view of the other side. The room on the right will now be our dining room... unless we choose to make it into our exercise room! 

Below is a picture of my mom on the ladder, tearing down the drop ceiling and the tracks to it. Yes, I know you're not supposed to sit on top of the ladder. She marches to the beat of her own drum, lol. After tearing down the drop ceiling, we had a furnace installed, but instead of putting the drop ceiling back up, we decided to go ahead and just frame a ceiling and put up drywall.


So we went ahead and tore off the paneling and knocked down the plaster. I don't seem to have any pictures of that process, or I can't find them on my new computer. But either way, it was a mess and I'm glad it's done! So we were left with no ceiling and no walls. Just studs and exposed wiring.


We took advantage of not having walls to put in some more insulation. It is an on-going process, but hopefully we will get the whole house covered sooner rather than later. 

The framing of the ceiling was a pretty long task. We got most of the boards up and then realized that we didn't have it all leveled out because the original ceiling gently sloped upward in one corner. Rather than putting up drywall at an angle, we decided to readjust every.single.row and made them all level. Not fun at all. But worth it. 

Then came the process of putting up the drywall. We learned our lesson in the bedroom, so we measured twice, cut once ... ok, we had to trim a bit a few times, but nobody's perfect. : )

All in all, it went much smoother than the bedroom's ceiling. We had an extra set of hands and a little more experience under our belts. 


We happen to have two chimney columns in our house. One in the bedroom and one in the family room. So we've had to create a frame around each of those and cover them in drywall. We don't want to tear them down and risk putting a giant hole in the outside wall just yet. So after the ceiling was framed and we got some of the drywall up, we started framing the walls and the column. None of the studs are ever level with the others, so it's a very, very long process of adding shims or 2x4s and getting them all straight. 

Here you can see we have most of the ceiling done (waiting on the furnace and new wiring to be finished before closing it off completely). We also have the column covered. 

 We have gotten most of the walls framed, so we started putting up drywall. It really makes a huge difference in the feel of the room already. Much brighter and cleaner and I love it! Don't mind the mess in that room there, that's just our tool/supply storage room for the moment, lol. And we usually have it blocked off with a blanket because there are some wicked air leaks and it gets cold, so that's why the tube to the furnace is hanging from the ceiling. We moved it so the heat comes to the rooms we actually are using. 

Another angle with the drywall up on the walls. 

Recently I tried my hand at doing it all by myself and got that section to the right of the column done all on my own. It took me quite a while, but I learned a lot in the process.  Gus likes to sit and watch while we work ... and eat any stray pieces of wood (or drywall) that accidentally land in chewing range.

And our last big work day was last weekend and we got another wall finished, except for one small corner piece.  My mom and dad came out and helped us with the walls and the wiring.

This mess is the finished product ... for now. Around that corner on the left there are a few sections that need to be finished, but we now have the entire ceiling done except for the middle part where the furnace needs to be adjusted. 

Next time we need to clean up BEFORE we take the pictures, lol. But here is that small corner. 

We're hoping to work on it a little bit throughout the week and see what we can get done and then have another good go at it this weekend.

We are trying to decide what to do with this corner though. We would really love to move the door from the kitchen into the family room, to that wall to the right of the TV in the picture below. It would really open up our kitchen and I think would just be a better fit for us. The problem is determining if it is structurally sound that way. We also need to create a header for that archway between the kitchen and the family room because whoever built the addition didn't bother with one. So those will be our two big tasks, if we choose to do so... well, the header is a must, but we may end up not moving the door. Or we may wait and move it some time down the road too. We'll see.


So that's where we currently stand. I'll try to update more often as we make more progress!

Sunday, March 2, 2014

What Am I Doing?

I thought it was time to get back in here and let you know what I've been up to with the fitness/nutrition/weight loss situation. 

This winter has not been great. I guess I've never really been able to lose weight in the winter though. I struggle with the winter blues/SAD and each winter seem to rely on a different coping strategy. Last year it was sudoku and reading to zone out. This year I have been sleeping a lot. Emotionally it has been better this year though, so that's good. But I've had huge cravings like you would not believe. And I've indulged in those cravings more than I should have. 

So, as much as I am embarrassed to say this (again) ... I am starting over (again).

I'm trying something slightly different, although not really. Make sense? lol

Whole9 | Let us change your life.
Credit: whole9life.com
I'm still going to follow the free Whole30 plan when I cook at home and try to make sure not to keep any ingredients or snacks at home that aren't Whole30 compliant. But, one of the rules of Whole30 is to not count your calories. I've tried that. I have followed Whole30 for the month twice now and I do great, but then I slip up a little bit and I go berserk and eat everything in sight. So this time I'm going to allow a few not-so-Whole30 compliant foods from time to time, but I will count the calories. I feel like this is the best choice for me at this time because I need some kind of middle ground until I get into a groove and get that motivation and determination back. 

So that is the nutritional side of things.

Credit: fitnessblender.com


As far as exercise, I am trying (once again) to complete the Fitness Blender 8-week challenge. I've talked about it a few different times, but so far haven't made it through completely. So I'm going to see what I can do about that. I am planning on working out 3 - 5 times during the week, taking the weekends off, and I will get through it as quickly, or not, as works for our life. Sometimes we spend all day working on the house, so I wouldn't necessarily feel up to a big workout after all that and I don't want to feel forced into it; I never do well when I feel restricted. So I'll just play it by ear and see how it goes.

I feel like I've started things and have gotten off track so many times now, but each time I feel like I learn something a little bit different. Kind of like dating, lol. You have to kiss a lot of toads before you find your prince, ya know? : )

So I try all of these "diet plans" and I try different workouts and I decide over time what works for me and what doesn't. And I feel like I find something more sustainable each time. 

Why don't I just go back to what worked the first time? Well, as much as Weight Watchers helped me before to lose the 100 pounds, I can't afford a subscription at this time. Also, I don't necessarily agree with the plan completely now. But that doesn't mean I'm not going to take parts of it and use it to create a plan that works for me. I think that's the best I can do for myself at this time. 

2008 - 2010 (Down 100 pounds)

So today is Day 3. I started on Friday, February 28th. I stayed within my calorie limit and I completed my first workout. I will tell you that I am still feeling the muscles today and I'm happy to have had a small break before hitting it hard again on Monday, lol. 

One of the things that I realized already, is that I feel more capable of pushing the plate away even though it still has food on it. I know that I have a certain calorie allowance, but I can have more tomorrow. When it was all or nothing, I would feel like I had to eat everything all in one day so I could start fresh the next day. But with the plan I'm doing now, I know that I can have a couple of bites of a sweet and not blow the whole day. I can do it! And I'm excited! I haven't been able to really say that about my weight loss journey in a while. 

So I'm hoping to check in here more often and let you know how I'm doing. Maybe do some kind of weigh in ... but like I said, don't want to make too many rules because then I just get discouraged when I can't keep up. So we'll see. I wish all of you luck with your own journeys out there, struggling or not. It's not always easy, but it is worth it to get to be healthy!

Friday, February 7, 2014

Pumpkin Pecan Cake

My mom's birthday was January 14th, so about a month ago. Since Hubby and I had given up sugar and grain we knew we wouldn't be able to do a traditional cake. And we also know that, as a nurse, she always gets a bunch of sweets and cakes from her awesome coworkers at the hospital. So I knew if I made a paleo cake, she wouldn't be missing out, even if she didn't like the cake. And I wanted to surprise her and see if she actually liked it. 

My mama!
So I started looking up recipes online. I tend to stay away from recipes with more expensive ingredients or ingredients that I will use once and then they will expire. I also stayed away from all of the recipes that use a bunch of dates. I've tried that before and it's good, but not really exactly what I was hoping for. 

I happened to find a recipe on The Clothes Make The Girl, another great blog to follow if you're wanting some new reading material! :)

Credit: The Clothes Make the Girl

This recipe wasn't for a chocolate cake, which I was hoping to find because she absolutely loves chocolate. This recipe was a pumpkin gingerbread cake. I love pumpkin and I love gingerbread, and I know my mama does too. And for the frosting, which I thought would be impossible, there was a maple-vanilla concoction! It only took me about 0.004 seconds to decide that would be a really yummy combination and the ingredients checked out alright, so I decided to go for it and hope for the best. 

I got the ingredients and threw it all together according to the instructions. I did end up having to use butter in the frosting instead of coconut oil because I forgot to get more of that and I didn't have any cardamom, but otherwise all was good to go. I put it in the oven at their house and she kept asking what I was making. I told her it was a surprise, but it was smelling good, so I was hopeful it'd be a good surprise!!

I ended up misjudging the frosting. Coconut butter tends to melt very easily and I didn't wait long enough for the cake to cool before trying to put the frosting on top, so it was a little runny and I ended up just leaving it in the fridge to let the frosting settle. I also didn't cut them into little bars but just layered the frosting over the entire top of the cake, more like a traditional birthday cake.

Then came time to cut! My mom was anxious to try. She loves treats and especially loves trying new things. They are on a very non-paleo diet so it was a totally new thing for my mom and dad. My dad was not quite so eager I don't think, lol. 

Taste test: It was delicious. It tasted exactly how I hoped it would. It took Hubby a couple of bites, but then he was hooked. My mom loved it from the start too. My dad said it tasted like cardboard ... well, you can't please them all, lol. And 3 out of 4 ain't bad, especially since he isn't used to eating paleo and his palate is a bit different. I'm convinced it's a keeper!

But I'll let you be the judge. Try it for yourself and let me know what you think! Here's her recipe:

Ingredients:


Cake:

  • 1 cup pumpkin puree (NOT pumpkin pie filling)
  • 1 cup Justin’s Maple Almond Butter (Can sub with plain almond butter + 1 tbsp maple syrup.)
  • 1/4 cup honey
  • 2 large eggs
  • 1 1/2 teaspoon baking powder
  • 1/2 teaspoon baking soda
  • 1 teaspoon vanilla extract
  • 1 teaspoon cinnamon
  • 1 teaspoon ground ginger
  • 1/4 teaspoon nutmeg
  • 1/4 teaspoon cloves
  • 1/4 teaspoon cardamom
  • 1/2 teaspoon lemon zest
 

Frosting:

  • 1/3 cup coconut butter
  • 1/2 cup coconut oil
  • 1/2 tablespoon honey
  • 1 tablespoon maple syrup
  • 1 teaspoon pure vanilla extract

Optional:

  • Pecan halves or whole almonds for garnish


Instructions:


1. Preheat oven to 350F.
2. Make the cake. In a medium sized bowl, combine all the cake ingredients and mix thoroughly to combine. Pour into an 8×8 oven-safe baking dish. Bake until completely cooked through, about 30 minutes.

3. Make the frosting. Place the coconut butter and coconut oil in a microwave-safe dish and heat until softened, but not melted. The length of time you need to nuke it will depend on the temperature in your house, so start with 30-second increments and repeat until you get the right consistency. Place the coconut butter and oil in a large mixing bowl, then add the honey, maple syrup, and vanilla extract. Beat until fluffy with a standing or hand mixer. If you don’t have a mixer, go at it with a whisk… and good luck to you!

NOTE: I almost always over-heat the coconut oil and coconut butter, and it gets liquidy. Here’s what to do: mix it per the instructions above, then let it sit at room temperature. As it cools, it will thicken a bit. When it’s the consistency of very thick honey, drizzle it on top of the cold cake. It will tighten up like a frosting glaze, then refrigerate.

4. Assemble! Allow the cake to cool completely. Completely. When you’re sure it’s cool, you may cut it into 9 or 16 squares. Dollop a spoonful of frosting onto each square and top with a nut.

5. Chill out. When all squares are frosted, cover lightly with plastic wrap and refrigerate. The frosting will firm up in the fridge and the texture transforms into a confection. Serve the cake squares chilled or at room temperature.

Thursday, February 6, 2014

Rollin' In The Dough


Ever since we got rid of the grains, the processed foods, and the dairy Hubby has had a hankering for some bread. I have to admit, I have too. We were are total carb junkies. Bagels were my best friend! Ahem, anyway, we like bread.

I happened to see a recipe posted from one of my favorite websites, Against All Grain, and I decided to check it out. I usually do a quick survey of the ingredients used before deciding whether to Yumprint the recipe. Yeah, pretty sure Yumprint is a verb now. If you don't know what Yumprint is, you can check out my review HERE!

This recipe seemed to be ok. I don't have a ton of specialized ingredients like coconut aminos or the really expensive spices so I try to find recipes without a lot of improvisation. This one worked. So I stored it and set it in my grocery list.

Grain-Free Paleo Bread

I was a little skeptical at first because I was thinking the nut butter would be overpowering, or maybe the coconut flour. I did end up using some peanut butter instead of the cashew butter. I know, I know. Not Whole30 compliant, but it's what we had and it's cheaper. Getting back to the flavor, it was pretty surprising... and in a good way. It tasted like bread. It was a little denser, which made me happy that I picked up some unsweetened almond milk to try, but otherwise it was delicious. I did the 2 tbsp. of honey instead of just 1/2 and didn't think it was too sweet to use for regular bread, but we did end up making french toast with it. I couldn't resist. Let me tell you, that bread is super filling, so I wouldn't make a ton like we did. It ended up being ok though because we had it for breakfast the next day too.

I haven't made it to use for sandwiches yet. Honestly, the first loaf I made did not last long at all. Not even 24 hours, lol. I think we were just so excited because we hadn't had bread in so long... plus, I made most of it into french toast so we had to get 'er done! I don't regret it.

So I can't vouch for how long it stores, but she says it will be good for a week. I don't think we'll ever find that out in our household, lol.

Ingredients:

  • 1 cup smooth raw cashew butter at room temperature
  • 4 large eggs, separated
  • ½ to 2 tablespoons honey (use 2tbl if you plan to use if for sweeter dishes like french toast)
  • 2.5 teaspoons apple cider vinegar
  • ¼ cup almond milk
  • ¼ cup coconut flour
  • 1 teaspoon baking soda
  • ½ teaspoon sea salt

Instructions:

  1. Preheat your oven to 300 degrees.  
  2. Line the bottom of an 8.5×4.5 loaf pan with parchment paper, then spread a very thin coating of coconut oil on the sides of the pan.
  3. Beat the cashew butter with the egg yolks, then add the honey, vinegar, and milk.
  4. Beat the egg whites in a separate bowl until peaks form.
  5. Combine the dry ingredients in another small bowl. Make sure your oven is completely preheated before adding the egg whites and the dry ingredients to the cashew butter mixture. You don’t want your whites to fall, and the baking soda will activate once it hits the eggs and vinegar.
  6. Pour the dry ingredients into the wet ingredients, and beat until combined. This will result in more of a wet batter than a dough. Make sure to get all of the sticky butter mixture off of the bottom of the bowl so you don’t end up with clumps.
  7. Pour the beaten egg whites into the cashew butter mixture, beating again until just combined. You don’t have to be gentle with this, but don’t over mix.
  8. Pour the batter into the prepared loaf pan, then immediately put it into the oven.
  9. Bake for 45-50 minutes, until the top is golden brown and a toothpick comes out clean. Don’t be tempted to open the oven door anytime before 40 minutes, as this will allow the steam to escape and you will not get a properly risen loaf.
  10. Remove from the oven, then let cool for 15-20 minutes. Use a knife to free the sides from the loaf pan, then flip it upside down and release the loaf onto a cooling rack. Cool right-side up for an hour before serving.
  11. Wrap the loaf up tightly and store in the fridge for 1 week.